

Learn how to keep your alloys clean while preventing corrosion—with our complete cleaning and care guide.
Clean, shiny alloys can dramatically improve the appearance of your car, but the cleaning process is time-consuming, and many of us tend to put the job off.
However, the longer we leave our alloys, the harder it will be to get them clean. Indeed, if left long enough, the build-up of dirt and grime can permanently damage the metal.
Sell your car quicker
Driving around in a car with gleaming alloys is a pleasure in itself, and will provide peace of mind that they are in good condition. But taking care of your alloys is also important if you’re planning to sell your vehicle. First impressions do count, so having sparkling alloys could help sell the vehicle more quickly—assuming long-term damage hasn’t occurred!
Dealing with brake dust
A lot of the grime you see on your alloys is brake dust—a dark-coloured build-up of material from the brake pads (ceramic or metallic debris, depending on the brake pad type), as well as iron particles from the brake rotors.
This material is largely responsible for wheel damage over time, and will be an ongoing challenge throughout your car's lifespan.
In this article, we'll explore how to keep your alloys in great condition—which largely revolves around maintaining a regular cleaning regimen.
Don't forget the tyres
Keeping your tyres clean and in good condition is critical for the safe operation of your vehicle. As such, whenever you carry out maintenance on your alloys, it’s a good idea to take care of your tyres too—after all, doing both at the same time will save time. With this in mind, we'll look at tyre cleaning as well.
How often should I clean my alloys?
Most car cleaning experts agree that you should clean your alloys every week or so. If you live near saltwater, cleaning your alloys regularly is even more important, since salt is extremely corrosive to alloys. This is because salt causes a chemical reaction called oxidation, which corrodes the metal.
Tyre cleaning should be undertaken every two months, although as mentioned, it may be convenient to clean them at the same time as you clean your alloys.
What do I need to clean my alloys and tyres?
Consider investing in the products listed below to get the best results from your cleaning efforts.
In some cases, you may be able to save money by using household items instead. For example, a nail brush can work just as well on tyres as a dedicated tyre/wheel brush. And if you don’t have a pressure washer, you can use a regular garden hose and achieve similar results.
- Wheel cleaning buckets
- Wheel cleaner - 2-in-1 with fallout remover
- Tyre cleaner - multi-purpose
- Wheel brushes and wheel woollies
- Snow foam
- Tyre dressing
- Pressure washer/garden hose setup
- Microfibre towels
- Applicator pads
- Gloves
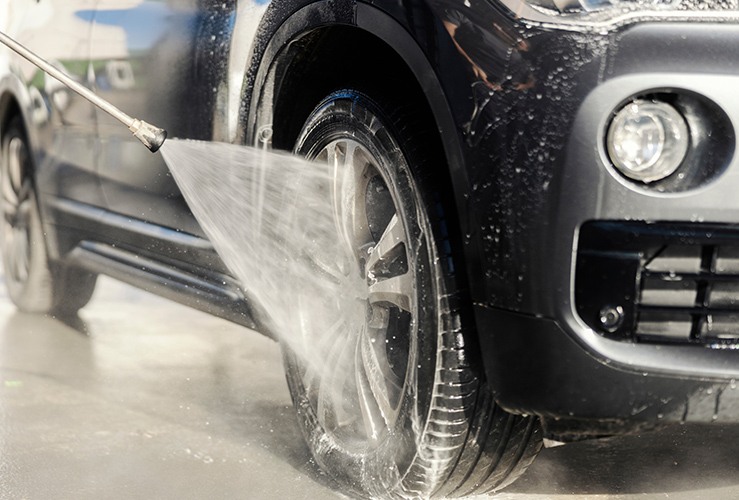
Rinse excess dirt
Begin the cleaning process by spraying the pressure washer on the alloys, wheel components, and tyres to remove excess dirt and grime. This will make life much easier later on.
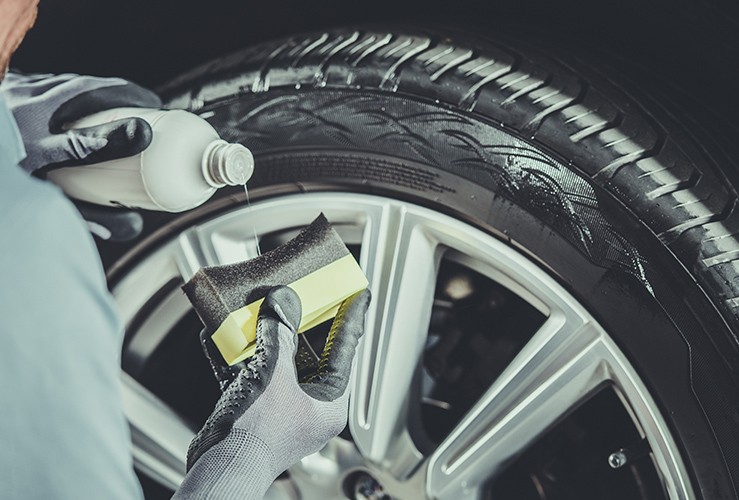
Add tyre cleaner
Next, spray on the tyre cleaner or APC (all-purpose cleaner), whichever you prefer. Let this application rest for a while in line with the product’s instructions. Needless to say, if you don’t leave the cleaning fluid on long enough, it won’t be as effective.
Apply wheel cleaner
You should then apply your wheel cleaner. Add the product liberally for the best results.
Add snow foam (optional)
By now, the foam on the tyres should be brown, and the foam on the alloys should be purple. If you plan to use snow foam, this should be applied next.
Adding snow foam is optional; you could simply pressure-wash the cleaning products off the tyres and wheels. However, some car cleaning experts say adding snow foam provides an extra layer of lubrication and keeps the cleaning products activated. Ultimately, adding snow foam should mean less work at the cleaning-off stage.
With the snow foam applied liberally, you'll see the browns and purples of the cleaning products stream down in a raspberry ripple effect.
Scrub the alloys
Scrub the alloys with pre-soaped wheel woollies and brushes. Caliper wheel woollies are especially good at accessing hard-to-reach areas behind the alloy components and spokes. This will help remove the dirt that the cleaning products have been tackling.
How much scrubbing you need to do will depend on how dirty the alloys are: brake dust and grime can be hard to remove if the alloys haven’t been cleaned for a long period.
Use a stiff brush to clean the tyres. If you don’t have one to hand, a nail brush will work just as well.
For the wheel arches, use a wheel woolly, Vicam brush, or similar. Ensure all the heavily caked-on dirt is removed or sufficiently loosened.
Rinse off the alloys and tyres
Next comes the really satisfying part: rinse off the suds with the pressure washer, ensuring all the bits of muck are removed.
Dry off the wheels
You can use a microfibre towel to dry off the alloys, tyres, and wheel arches. Ensure you don’t end up using the same towel for the car’s bodywork, as this could cause more problems than it solves by scratching your paintwork with debris from the wheel clean. It’s a good idea to colour-code your microfibre towels to avoid any mix-ups—although this is perhaps more for professional car cleaners.
Buying lots of drying products might not be the best course of action if you’re on a budget; you may be better off using funds to invest in a good pressure washer, as this will contribute more to having shiny, almost-new-looking alloys.
Remove stains
If you haven’t cleaned your alloys for a while, stubborn stains may remain on the metal.
You can tackle these with a 'clay bar' stain remover. These come in blocks of varying strength levels. Tear off a piece of clay and, with the lubricant provided, rub the clay against the stain in question. Any debris should adhere to the clay.
Clay bar packs usually come in three strength levels: mild, moderate, and strong. Start with the mild, and use higher strengths if required. Always use the lubricant provided, or you run the risk of damaging the surface of your alloys. After the stain is removed, dry the surface with a microfibre towel.
Knead the lump of clay so you can use it for the next stain (no need to use a fresh piece of clay each time).
You may also wish to clean your lug nut wells. Needless to say, you would need to remove the wheels to access them. A compound cleaner and rotary cleaning tool would be required to clean this heavily caked-on grime; hand-applied clay bars won’t be sufficient. However, cleaning lug nut wells is more of an advanced step and won’t make much difference visually.
Dress the tyres
The final step is to add a dressing product to your tyres. This will considerably improve their appearance compared to before and help protect them from dirt. Be sure to clean the area between the rim and the tyre—this often gets missed out.
Note that you should only apply tyre dressing to the tyre walls; adding it to any other area has an outside chance of compromising the integrity of your tyres, and moreover may reduce their grip on the road.
Additionally, avoid getting tyre dressing on any brake components, as this could make your brakes less effective. If you accidentally get any dressing on the brake system, be sure to clean it off.